
perfecting-egg-splitting
Perfecting Egg Splitting: 7 Steps to Culinary Success
Perfecting Egg Splitting: 7 Steps to Culinary Success
Have you ever found yourself in the middle of a recipe, needing to separate egg yolks from whites, only to end up with a messy, broken yolk? It’s a common kitchen frustration that can derail your culinary ambitions. Whether you’re whipping up a delicate meringue, binding a rich hollandaise, or crafting airy soufflés, mastering perfecting egg splitting is a fundamental skill that elevates your dishes from good to gourmet. This guide will walk you through the precise techniques, essential tools, and common pitfalls to avoid, ensuring flawless separation every time.
Why Master Perfecting Egg Splitting?
The humble egg is a powerhouse of culinary versatility, but its true potential often lies in its separated components. Understanding why and how to effectively split eggs opens up a world of possibilities in both baking and cooking.
Unlocking Versatile Recipes
Egg whites, with their unique protein structure, are perfect for creating volume and lightness. Think ethereal meringues, fluffy angel food cakes, or crisp macarons. Egg yolks, rich in fat and lecithin, are incredible emulsifiers and flavor enhancers, ideal for custards, mayonnaise, or creamy sauces. Achieving a clean separation means you can utilize each component precisely as intended by the recipe, ensuring optimal results.
Achieving Desired Textures
Imagine a perfectly stable meringue that holds its peaks, or a velvety smooth crème brûlée. These textures are often dependent on the exclusion of one egg component from the other. Even a tiny speck of yolk in egg whites can prevent them from whipping up properly, leading to flat, disappointing results. Conversely, egg yolks provide richness and prevent crystallization in certain desserts. Mastering perfecting egg splitting is the secret to achieving these desired textural perfections.
Essential Tools for Clean Egg Separation
While you can separate eggs with just your hands, having the right tools can make the process faster, cleaner, and more foolproof. Here are some options:
- Egg Separator: A specialized gadget designed to catch the yolk while allowing the white to drain through.
- Small Bowls: Always have two bowls ready – one for yolks and one for whites. An additional small bowl for cracking each egg individually is a pro tip to prevent a bad egg from spoiling your batch.
- Clean Hands: Your most basic and often most effective tool. Ensure they are thoroughly washed and dry before handling eggs.
- Slotted Spoon or Ladle: Can be used in a pinch to scoop out a rogue yolk from whites.
- Plastic Bottle (empty & clean): A surprisingly effective hack for sucking up yolks.
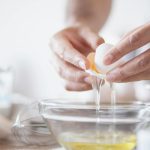
Step-by-Step Guide to Perfecting Egg Splitting
Follow these steps for a consistent and clean separation, ensuring your yolks remain intact and your whites are pristine.
- Start with Cold Eggs: While some prefer room temperature eggs for whipping whites, cold eggs have firmer yolks that are less likely to break during separation. Allow the separated whites to come to room temperature before whipping if needed.
- Prepare Your Bowls: Place two clean, dry bowls on your counter. One for the yolks, one for the whites. An additional small bowl for cracking each egg is highly recommended.
- Crack Each Egg Individually: Gently tap the egg on a flat surface (not the edge of a bowl) to create a clean crack around the middle. Using a flat surface reduces the chance of shell fragments falling into your egg.
- Open the Shell: Hold the egg over your individual cracking bowl and carefully split the shell into two halves, letting the white fall into the bowl.
- Transfer the Yolk: Gently pass the yolk back and forth between the two shell halves, allowing the remaining white to drip into the bowl. Be patient and gentle to avoid breaking the yolk.
- Clean Transfer: Once all the white has separated, carefully drop the yolk into its designated bowl. If any shell fragments fall in, use a larger shell piece to scoop them out – they’re attracted to the shell.
- Repeat for Each Egg: Continue this process, cracking each egg into the individual bowl first, separating, then adding to the main yolk/white bowls. This prevents a broken yolk from contaminating an entire batch of whites.
Common Mistakes to Avoid When Splitting Eggs
Even seasoned cooks can make errors. Being aware of these common pitfalls will help you achieve better results.
Yolk Breakage Prevention
A broken yolk is the arch-nemesis of perfectly whipped egg whites. The fat from the yolk prevents the whites from aerating and achieving stiff peaks. Always handle yolks gently, especially when passing them between shell halves. If a yolk does break, save those whites for an omelet or scramble, and start fresh for recipes requiring pristine whites.
Contamination Concerns
Beyond yolk, small pieces of eggshell or even a greasy residue on your bowls or hands can hinder egg white aeration. Always ensure all your equipment is impeccably clean and dry. For more on the science behind egg whites, consider exploring resources like Serious Eats’ insights into meringue science.
Creative Uses for Separated Egg Yolks and Whites
Now that you’ve mastered perfecting egg splitting, what to do with your perfectly separated components?
Delicious Egg Yolk Recipes
Egg yolks are the heart of many rich and creamy dishes. Think classic custards, luscious ice creams, homemade mayonnaise, or a velvety hollandaise sauce. They also add richness to pasta carbonara or can be used to temper hot liquids without curdling. For more on the distinct properties, America’s Test Kitchen offers a great explanation.
Innovative Egg White Applications
Egg whites are essential for creating lightness and structure. Use them for crisp meringues, light soufflés, angel food cake, or macarons. They can also be folded into batters for extra fluffiness or used to clarify broths for a crystal-clear consommé. Don’t let those whites go to waste!
Advanced Tips for Perfect Egg Splitting
For those looking to refine their technique even further, consider these professional tips:
- The Water Bottle Method: Crack an egg into a shallow bowl. Squeeze an empty, clean plastic water bottle, place its opening over the yolk, release the squeeze to suction the yolk into the bottle, then gently squeeze again to release it into another bowl.
- The Hand Method: Crack the egg into your clean, cupped hand. Gently spread your fingers slightly, allowing the white to slip through into a bowl below while the yolk remains in your palm.
- Temperature Control: For recipes requiring whipped whites, separate cold and then let the whites come to room temperature. Room temperature whites whip to a greater volume.
Conclusion: Elevate Your Culinary Skills with Perfecting Egg Splitting
Mastering the art of perfecting egg splitting is a small but significant step towards becoming a more confident and capable cook. It unlocks a wider range of recipes, ensures superior textures, and minimizes waste in your kitchen. By following these simple steps and understanding the nuances of egg separation, you’ll be well on your way to culinary success, creating dishes that are as beautiful as they are delicious. Practice makes perfect, so grab some eggs and start experimenting today!
© 2025 thebossmind.com
Kitchen egg separation, perfect yolk white split, culinary egg techniques
Featured image provided by Pexels — photo by Pavel Danilyuk